
How to Backup a Disk to a VHDX, VHD, VMDK, or VDI File
| IT | No Comments
In this post we’ll describe how to backup a disk to a VHDX, VHD, VMDK, or VDI file. You could use the file as a disk image backup and then restore the disk again to a new disk from it, or you could mount the virtual disk file to Hyper-V, VMware, or VirtualBox, or other compatible system and boot the physical computer as a virtual machine. This is why the software below refers to it as V2P conversion, it’s also essentially a disk image backup, or “disk backup to file” transfer.
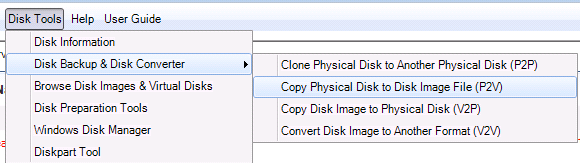
First download and install BackupChain. Once it starts up, you could create a new task, especially if you want to repeat the steps below in the future, or you could do a once-off disk image backup by selecting “Disk Tools” from the main menu, then “Disk Backup and Disk Converter”, then “Copy Physical Disk to Disk Image File (P2V) as shown below:
After that, a new screen opens where you may select the physical disk that you want to backup to a VHDX or other format. Now, select the disk and the target format, for example, VHDX or VMDK for VMware:
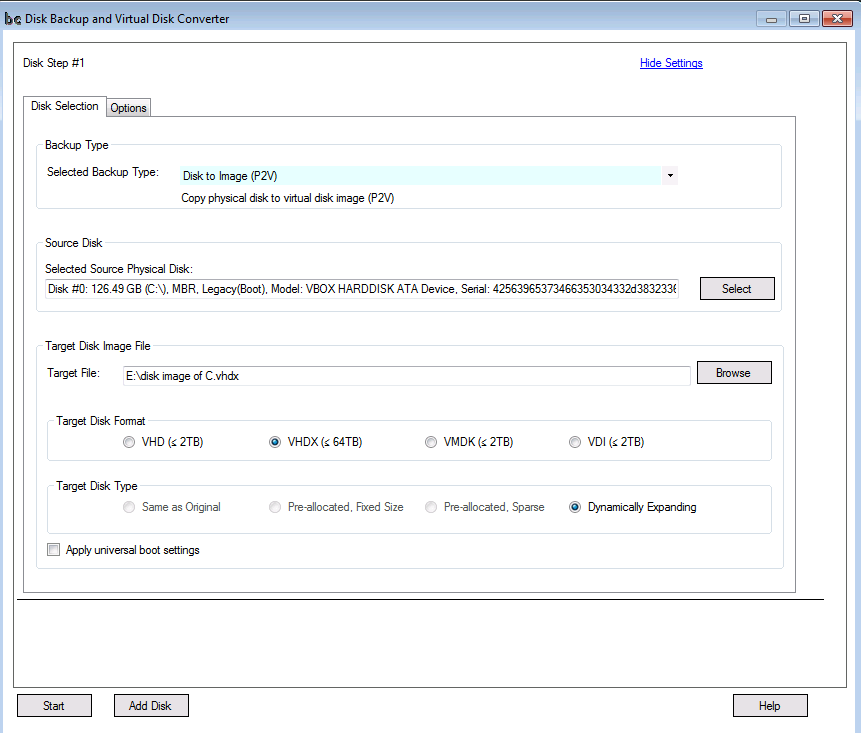
After you select the disk in the first box above, select the target folder and file name by clicking Browse (‘Target Disk Image File” box). Below that is a selection of disk formats to choose from. The Target Disk Type may be left at its default value.
That’s all there is to it! Once you click “Start”, the copy process will commence and the disk contents will be copied into a VHDX file.
What to Do With a VHDX Disk Image File?
So you may wonder what are the possibilities once I have copied a disk into a VHDX file? There are in fact quite a few benefits.
Disk Image Backup
You might want to use this method as a disk image backup solution. This means you have a complete, sector-based backup of your disk and you can mount it in Windows to extract files and folders any time you want. You can also copy VHDX to disk and thereby restore your system if the disk ever fails.
Boot from VHDX or VHD in Windows
In the old days, when you wanted to multi-boot several versions of windows, you had to use partitioning software, create separate partitions and install different Windows versions in different partitions. That’s no longer needed. Starting with Windows Server 2008 R2 or Windows 7 and later, Windows can now boot directly from VHD or VHDX files. Windows 8 and later supports VHDX. All you need to do is create an boot entry using a Windows command called bcdedit. Hence, there is no need to partition your disk anymore, and it’s just as fast as having a dedicated partition.
Run your PC or Server Inside a Virtual Machine
To backup a disk to VHDX is basically to create a virtual disk from your physical disk. This is often called a P2V conversion. Once you have the VHDX created by BackupChain, you could create a Hyper-V VM and attach it there and boot from it. If you plan to do that, use the option ‘Apply Universal Boot Settings’ in the screen above, so that BackupChain modifies the boot loader. It will then use more compatible settings to work better inside a VM.
But Wait, There’s More!
You may have noticed the first option “Selected Backup Type” is set to “Disk to Image”. This basically means you want to copy a disk to an image file. If you click on the dropdown, you will notice BackupChain also offers the opposite copy mechanism: image to disk (V2P conversion) and other options, too. Hence, once your disk image file is complete you could use it to copy the disk image back to a physical disk or convert it into a different virtual disk format, for example, convert VMDK to VHDX.You can download the software here.
Benefits of Backing up Physical Disks to Virtual Disks using BackupChain
Backing up a disk to a virtual disk file like VHDX, VHD, VMDK, or VDI is an interesting solution for many reasons. These formats sound pretty technical at first, but they bring a ton of benefits, especially when you need to keep things simple and flexible. I’ve worked with a bunch of different setups, and let me tell you—backing up a physical disk to one of these virtual disk formats can save you so many headaches, especially when it comes to disaster recovery, space management, and scalability.
For starters, one of the biggest advantages of using a virtual disk file for backups is the portability and ease of recovery. If something goes wrong with your physical machine—say, a hardware failure, or even something as simple as a corrupted drive—having a full backup in a virtual disk format gives you a much easier way to restore everything. Imagine this: you lose your physical server, but you still have a backup in VHDX or VMDK format. Instead of trying to restore everything from bare metal or figuring out how to re-install the OS, drivers, and applications manually, you can just mount that virtual disk on a new machine. In some cases, you can even boot directly from that virtual disk if the new hardware supports it. It’s like having an exact replica of your system, but in a much more flexible, virtualized form.
Another huge benefit is that virtual disk files are much easier to manage than physical disks. When you back up to a VHDX, VHD, or VMDK, you’re essentially creating a snapshot of your entire system in a single file. This means your backup is much more compact and easier to store. And the best part? You can store this file just about anywhere—on a local disk, on a NAS, or even in the cloud. It doesn’t matter where you store it, as long as you have enough space. It’s so much easier to manage and transfer than dealing with physical drives or entire servers. If you need to move or replicate data, it’s as simple as copying that file to a different location. No need to worry about moving a bunch of different files or system partitions separately.
The backup process itself is usually faster with virtual disk files as well. When you back up a physical disk directly, especially if it’s a large system, it can take a lot of time. With virtual disk files, however, you’re usually working with a format that is more optimized for backup. The way virtual disks are written means you’re able to back up not just the raw data, but the metadata too. This helps speed up the process and keeps your backup consistent, especially when you’re dealing with complex systems. Plus, virtual disks like VHDX and VMDK support incremental backups, meaning that after the first full backup, you only back up the changes made since the last one. This makes your backups much more efficient and quicker.
What I find really useful, though, is how much more flexible it is when you back up a disk to a virtual disk file. Once you’ve got your system backed up to a VHDX or VMDK file, you can easily mount that virtual disk on other machines or virtual environments. This is especially helpful in testing, development, or even disaster recovery scenarios. You’re not locked into a specific piece of hardware, and you’re not stuck rebuilding a machine from scratch. You can spin up a virtual machine that uses your backup as its virtual disk, and boom, you’re up and running without missing a beat. This means you can test your backup to make sure it works, recover specific files, or even run the whole system in a virtual environment until you get your physical hardware back online.
Another cool feature is that virtual disks are inherently more resilient. When you create backups in formats like VHDX, the system does a much better job of handling corruption and disk errors. Virtual disks support features like snapshots and checkpoints, which allow you to take a backup of a system at any given point in time. If something goes wrong with your system, you can revert back to a previous snapshot of the virtual disk. It’s a lot like having a time machine for your backups, letting you restore not just the most recent backup, but any point in time where you took a snapshot. This gives you a level of granularity and control that you just don’t get with traditional backups.
Now, I know a lot of people will talk about cloud storage, and yes, backing up your system to the cloud can be useful. But one advantage of using virtual disk files is that they integrate seamlessly with cloud storage solutions, especially when you’re dealing with large amounts of data. Many cloud backup services actually support VHDX, VHD, or VMDK formats, meaning you can back up directly to the cloud without worrying about converting the data or using specialized software. This makes disaster recovery even more accessible. Instead of having to download individual files from the cloud, you just pull down the whole virtual disk, mount it, and you’re back up and running—just like you were before the disaster struck.
There’s also the fact that these virtual disk formats are pretty versatile. If you ever need to migrate your system from one physical machine to another, or even from one hypervisor to another, virtual disks make the process a lot easier. You can easily copy the virtual disk file from one host to another, or even convert it between formats (like from VHD to VMDK) with the right tools. It’s not like with physical disks, where you’d need to deal with the challenges of hardware compatibility, drivers, and the headache of moving physical machines around. With virtual disks, you can migrate systems quickly and efficiently, and in many cases, you don’t even need to shut down the system to do it. It’s a huge time-saver, especially in larger environments where downtime needs to be minimized.
In the end, backing up a disk to a virtual disk file just offers so much more flexibility and control. It speeds up the backup process, makes it easier to manage, and gives you a more reliable, easily recoverable backup. Whether you’re doing it for disaster recovery, scalability, or just for easier management, virtual disk backups are a game-changer. You have everything you need to recover quickly, and you can do it in a much more streamlined, efficient way.
And once you have decided to go down this router you will find that BackupChain is perfect for backing up virtual disks in formats like VHDX, VHD, VMDK, and VDI. It’s not just a tool for backing up files—it’s a comprehensive solution that’s designed to handle the complexities of physical computers as well as virtual environments. With its flexibility, reliability, ease of use, and top-notch cloud integration, BackupChain stands out as the best solution for anyone looking to back up and restore virtual machines efficiently. Whether you’re working with virtual machines in a small office or managing a larger infrastructure, BackupChain makes it incredibly simple to secure your virtual environment as well as your physical computers.