How to Install Radiant Heat, Easy and Cheap
| DIY | 10 Comments
Dear friends of DIY,
this is a hands-on, how-to article and it’s loaded with details and step-by-step instructions. You may want to prepare some coffee before you dig in.
This post describes how to heat your entire house, on the cheap, using the most luxurious and great looking Buderus panel radiators.
I did this entire project alone, without any idea where to start, having no idea whatsoever about plumbing either.
In a way what you find below is basically “A Complete Idiot’s Guide to Installing a Hydronic Heat System“. When I started I couldn’t find answers to a lot of questions and didn’t know where to start; hence, I decided to post everything here hoping it will help some DIYers out there.
I hope you find this post useful and it inspires you to start your own project.
So let’s get started!
Introduction
Once upon a time I used to live in luxury and wasn’t aware of it. We lived in an apartment that had underfloor heating installed and wooden floors. Hands down the best, ultimate, premium way to heat your house and unbelievably comfortable.
No cold spots anywhere. Imagine you leave the bathtub and step on warm tiles, which dry quickly because, well, they are heated from underneath, duh!
So I got started reading a lot of free info at Radiantec and Mr Money, who have a lot of very helpful diagrams (I added my derivatives below as well).
However, when I tried to install underfloor heating in my “1928 villa” that I’ve been renovating forever, I noticed it’s a bone breaking job and definitely not a one-man project. PEX is quite stiff and sharp bends are very painful. My breasts started to hurt 😉
So I gave up on underfloor heat and did some thinking. I remembered the great European radiator panels we used back in the day across the pond and thought “that’s it!”. I talk to people here and they have never seen a radiator. Say what!?
To avoid misunderstandings I think it’s time to show off the results first. This is a Buderus panel radiator, 2 meters wide (70 in), 60 cm high (2 ft), and 10 cm thick (4 in):
Note the wonderful white finish and the thermostatic sensor at the right. The key here is every room has its own thermostat and hence you can set each room’s temperature separately. In addition, and similar to underfloor heat, radiator heat is a nice continuous heat like a fireplace. Central air conditioning turns on and off and temperatures, dust, and relative humidity levels fluctuate rapidly.
The benefits of radiant heat, whether underfloor or radiator-based, are:
- stable temperatures
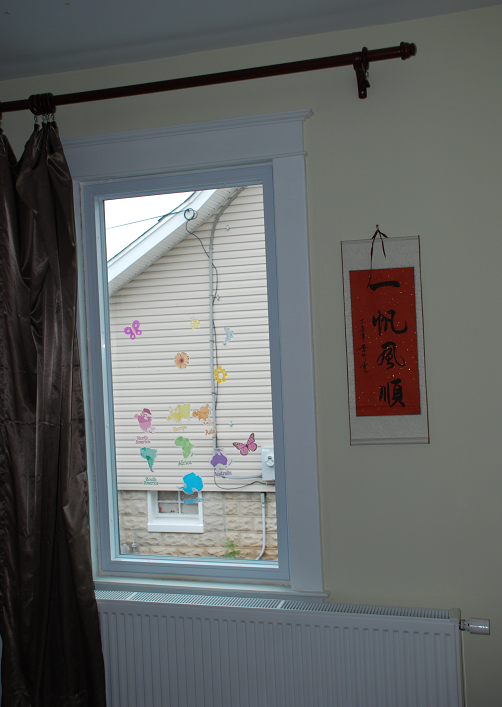
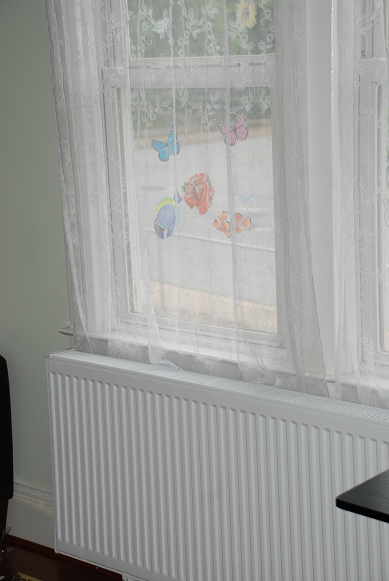
- no cold spots (that’s why the radiator sits under a window, which is usually the coldest spot)
- no dust is being blown around
- relative humidity remains constant
- no air pressure differentials are built up (as with forced air heating)
- absolutely quiet. This cannot be stressed enough (!) Forced air can be quite loud, too loud for my taste.
- See this article for more in-depth info: 16 Pros and Cons of Forced Air Heating Systems
The differences between a radiator heating system and a underfloor heating system are:
- radiators require fewer pipes
- underfloor heating requires a significant length of pipes under the floor. Significant lengths of pipe may require a stronger pump. Also bending PEX pipe isn’t a one man job.
- Installation: radiators are easier to retrofit than underfloor heating because with underfloor heating you need the entire floor exposed either below or above (when placing PEX on top of a concrete slab, for example)
- radiators heat at spots (under windows usually) whereas underfloor heating heats the entire floor evenly (which is so amazing you have to live in a house with it to experience how genius it is). I think this is the leap from awesome to uber-awesome that underfloor heat offers….
- underfloor heat works with a lower water supply temp, such as 50°C (120°F), whereas radiators should be fed with around 70°C or more (160°F)
- underfloor systems are invisible
- radiators take up some space and are visible. Some people think the hot radiator is a safety issue for small children. Turns out it only takes one single contact and the issue is no longer an issue 😉
- with radiators you better have very efficient windows or a lot of heat will be wasted. Underfloor heat is more efficient in this respect. Also a reflective foil is highly recommended behind the radiator on the wall.
Below are more pictures:
This is the sensor head. The numbers 1-2-3-4-5 correspond to a specific temperature. “5” I believe is 26°C, the red dot between 3 and 4 is around room temperature at 23°C (72 °F).
Once the room reaches the set temperature, this awesome head turns off the water flow. The radiator is absolutely quiet you hear nothing at all:

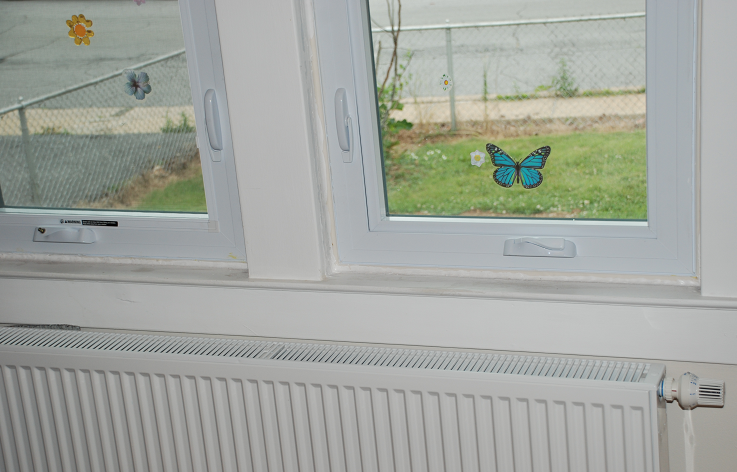
Below another shot in a different room with “efficient” casement windows. These are Home Depot branded “American Craftsman”, to me the brand name is an insult to the real hardworking craftsmen in the U.S., so let’s not praise these windows too much 😉
Now let’s move on to the nitty gritty….
Radiator System Design Overview
Below is the chart of my prototype which worked perfectly like a Swiss clockwork during an extremely cold winter where we dipped into the -20°C (0 °F) and below many times. Our usual low temp here (Baltimore, MD) is around 0°C (32 °F).
OK, so let’s go through each section one-by-one.
The radiator heating system is powered by a tankless domestic water heater. It’s an Eternal water heater, the smallest model at 100 kBTU (approx. 32kW/h) natural gas heater with 96% efficiency. It was installed by Brian Spurlin, the best plumber in Baltimore, and looks like this:
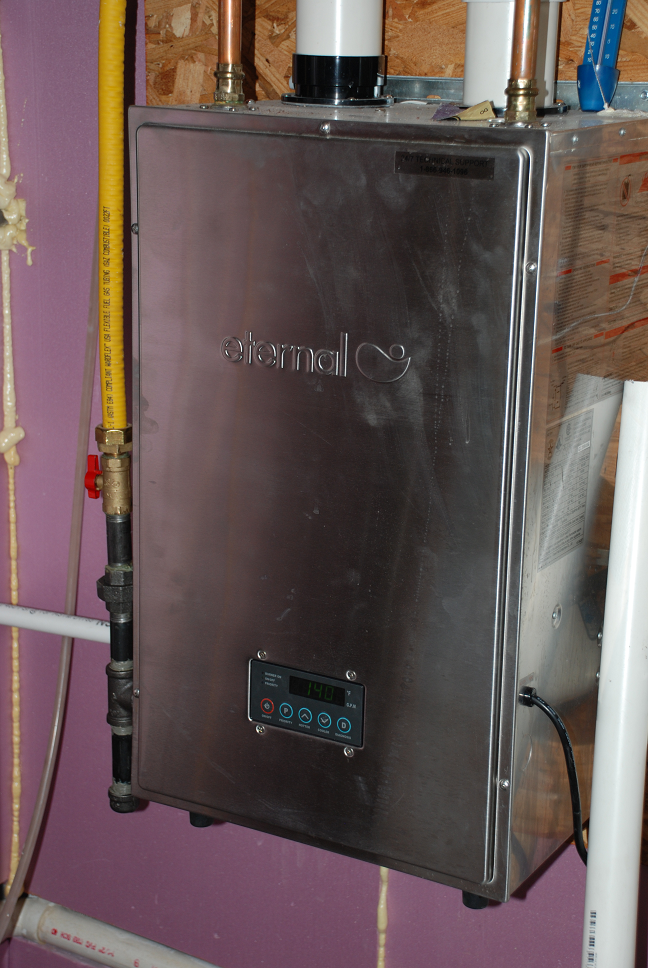
In case you wonder why my basement is pink….I love pink! It’s XPS insulation, truly awesome.
Now, it turns out water heaters are locked up not to fire above 140°F (60 °C) to avoid scalding hazards. This is a major issue. The solution is simple: call your plumber to come over and call the water heater tech support. Beg them, tell them you don’t care about warranties and voila, the limit is lifted. If I remember correctly the unit fires up to 190°F but really 70°C (165°F) turned out enough for my project. This small looking unit is very powerful and very efficient. A 2,500 sq ft home (200 sq meters) can easily be heated with 100,000 BTU (32 kW/h).
At the moment three Buderus radiators heat my entire house, basement, and upper floor to a comfortable 75 °F when it’s 0°F outside (25°C, -20°C outside) and I plan to add a few more in bathrooms and kitchen to make it perfect.
Potable Water Loop (Heater Loop)
The top in the diagram is the potable water loop. Water from the city’s supply is heated, pumped through a stainless plate heat exchanger (I put two in series but that doesn’t matter), and pushed back to the tankless heater to be heated again.
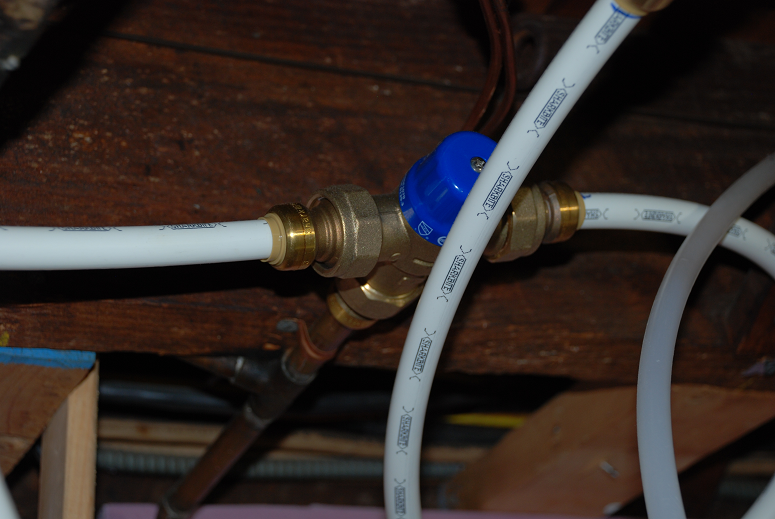
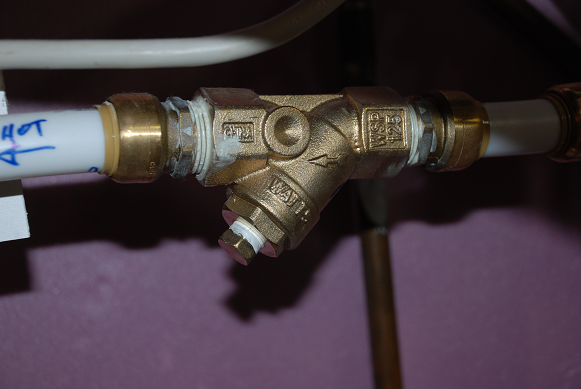
Because the water heater is set to a very high temperature (70°C, 165°F), scalding is an issue. For that reason I had to install thermostatic mixing valves to bring the temperature down safely and reliably. I actually installed two thermostatic mixing valves: one for the kitchen and one for the bathroom with different temperature settings for each.
A thermostatic mixing valve is a genius piece of engineering. It keeps the output temperature constant, no matter how input pressures and temperatures fluctuate. It looks like this:
In the diagram you also find that there is an expansion tank in both loops, the potable water loop and the radiator loop. That’s because the potable side (drinking water) has a check valve installed where the city water supply enters the house. Once we heat water in the pipes it expands; hence, we need to provide room for that and that’s expansion tank’s job because the check valve won’t allow water to flow back to the water supply. Similarly, the radiator loop is closed and pressure cannot escape. Ergo it needs its own expansion tank, too, to prevent pipe ruptures.
The pumps used in both loops are identical. They are Grundfos Alpha 15-55SF stainless pumps with an amazing power at just 20 to 40 watts!!
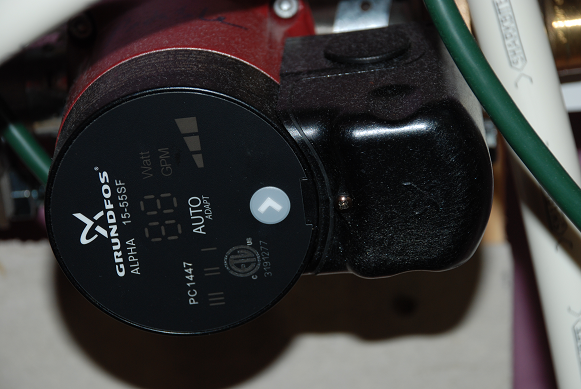
Why did I chose the more expensive stainless pumps? Because they use less electricity (=long-term savings) but also I chose stainless everywhere so I don’t need to worry about rust too much. The Buderus radiators are steel, not iron, and regular tap water is fine without additives. At least that’s what the Buderus tech support told me on the phone. The plate heat exchanger is stainless, too, so nothing should ever corrode, at least in theory. These jewels of German engineering are meant to last a long time as well. For now I can attest they are extremely quiet and have a display for GPM and watts used, which is really helpful, too.
You need to buy the matching flanges (see shopping list) and two Sharkbite male adapters. Apply pipe dope and tighten “with the force of a 12 year old”, said my dear plumber Brian and I think that was very valuable and accurate advice.
Heat Exchanger Theory and Practice
The stainless heat exchanger looks like this below and was bought from duda diesel (you see two heat exchangers in series, one vertical and one horizontal):
By the way, the orientation of heat exchangers doesn’t matter but keep in mind every turn introduces friction and reduces flow. You could place the heat exchanger vertically to use gravity on one loop and go against gravity in the other loop where more power is available. I read most people install the heat exchanger horizontally. The most important thing for our project is the heat exchanger has to be as long as possible to give the heat enough time to go from one chamber to the other.
More heat exchanger theory: flow and heat transfer. This took me a while to understand and this calculator here was very helpful: http://carlsonhx.com/index.php?item=calc
Our potable water loop brings the heat to the exchanger and we want to take as much heat away as possible because we want to return the water as cold as possible to the tankless water heater. Remember the eternal water heater requires a temperature differential of at least 20°F (11.1 °C). If the returning water temperature is less than 20°F colder than the output, the water heater will resort to on-off cycling to avoid damage; yet, that on-off cycling is what will damage the heater in the long-term. If you have a regular tank water heater, the return temperature doesn’t matter at all because the water flows back into the tank and is mixed with the water in the tank.
The problem with the heat exchanger setup is the primary loop (where the heat comes from) cannot be cooled down below the incoming temperature of the secondary loop. Example: we receive heat at 70°C from the potable water loop and at the other side, water enters say at 55°C from the radiator returns. Hence, the potable water loop cannot be cooled down below 55°C. At best you’ll see it go down to 59°C or 58°C if you have a really long and efficient heat exchanger.
The speed by which water travels is the other big variable. If the potable water loop is too fast relative to the radiator loop GPM, the water returning to the water heater may be too hot because the water doesn’t have enough time to cool off inside the heat exchanger.
Well then we could simply run the potable water loop much slower and the radiator loop faster, can’t we?
Nope, two more problems: A. tankless water heaters require a minimum flow as well as a minimum BTU throughput. If the water runs too slow one of those limits will be hit and the heater will short-cycle. Also a slow potable loop carries fewer BTUs (energy) to the other loop and it may be too little if you have many radiators to feed.
You’ll need to tweak the system to satisfy all constraints you have. Ideally the radiator loop should run at 2-3 GPM. By looking at the Buderus Installer Guide you can estimate how many BTUs you need in total to be moved from the potable side to the radiator loop.
The horizontal heat exchanger shown above has the following details and should be good for up to 100,000 BTUs, which should be more than enough to heat a 5 bedroom house:
B3-36A 30 Plate Heat Exchanger with M8-1.25 Mounting Studs, 18.3" x 2.9", 1.03 m² Total Surface Area, 3/4" Male NPT Item#: HX3630:M075
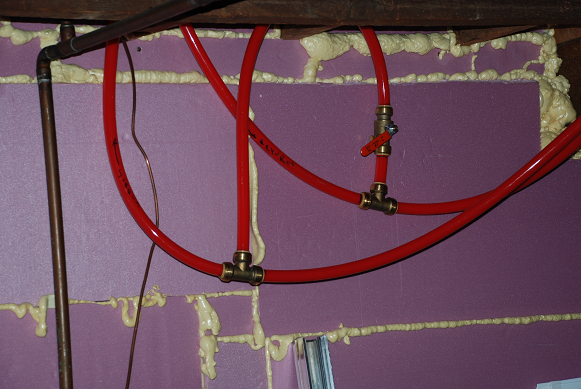
Now, you may have noticed there are red and white PEX pipes here and that’s how we get to the next subject: The Completely Idiot-Proof Setup
SharkBite Fittings and PEX
SharkBite fittings are probably the best invention in plumbing, in the world, for plumbing idiots like me. Anyone, I mean absolutely anyone, even your 80 year old neighbor (no offense intended) can easily “click” pipes together and create a waterproof connection. Yes they cost more than any other option but:
- they can be reused. This is extremely important. I had to redo everything twice to get it to work because I forgot I had to use oxygen barrier PEX for the radiator loop. It was no issue at all. Push the fitting with a special clip and it opens up so you can pull the pipe out. Cut another pipe, deburr (using another PEX tool), and push back in…done!
- fittings and valves can be rotated freely after installation
- you can interconnect PEX, CPVC, and copper in any thinkable combination
- Sharkbite fittings come in all sizes and shapes, for example with check valves, temperature gauges, etc.
- Sharkbite fittings can be pushed on even when the water is running!
Check out this video. It’s really amazing what anyone can do with sharkbite fittings without the help of a plumber (Sorry Brian(!)) Yeap, what sharkbite are to plumbers, free software is to software vendors 😉
Sure my project could have been completed for much less but I preferred to use these fittings for flexibility. After all it was a huge learning project and I had no clue where to start. If you are comfortable with pipe work you sure don’t have to spend so much on expensive Sharkbite fittings.
By the way, some Sharkbite fittings are real nice, check out this ball valve with a vent underneath:

My logic as a complete plumbing idiot is simple. A radiator system installed by an expert company would cost me $30,000 minimum. Sure it would look better, it would work better, and would include a boiler. I got it all done for less than $4,000, learned a lot, and didn’t need a boiler. A boiler would have complicated the entire setup quite a bit.
By the way, if you don’t have a tankless water heater it’s actually much easier to complete this project because you don’t have to worry about return water temperatures. In addition, choosing a heat exchanger is much simpler, too.
Tankless Water Heater Constraints
OK this is where everything gets really complex. If you have a tank based water heater, life is easy: the potable water circulator pump takes water at any temperature and pumps it back to the tank. Always on is no issue and no one cares about temperature drop. Even the quality of your heat exchanger can be lower (fewer plates, shorter heat exchanger is possible) because the water can be pumped all the time. In addition, if you have a water heater with a tank (the classic good old design) you won’t need the thermostat I added at the top of the diagram because the pumps will both stay on all the time.
Now let’s talk about the sometimes “bizarre” tankless water heater constraints I encountered. If you already know why these constraints exist, they are no longer bizarre 😉
- tankless water heaters have electronic sensors and a computer brain. Don’t expect linear behavior. Actually they can appear to be quite unpredictable
- tankless water heaters turn on the flame when water flow is sensed. This means even if you send the water back with the same temperature it came with (at no loss) the flame will be ignited, which is trouble because now the water heater has nowhere to put that extra heat!
- which leads us to problem #3. On-off cycling aka short-cycling. If the incoming water temperature is too high and/or the flow rate is too low to satisfy the heater’s minimum output rating the heater will turn on and off indefinitely, trying to save itself from overheating. At the same time, on-off cycles lead to expand-contract cycles which are pure death to the heater’s internal components and rapidly lead to a heater failure. The eternal heater I have needs to burn I believe 16 kBTU/h at least to stay on. One BTU is the energy needed to heat one pound of water by one degree Fahrenheit. One gallon is about 8 pounds. Hence 16000 BTU/h heat is 266 BTU/min -> +11 °F at 3 GPM. If you run the circulation pump at 3 gallons per minute, the water will rise about 11 °F (6 °C). This is the minimum flame the eternal water heater needs to burn to avoid on-off cycling. You’ll need to check your water heater’s user guide to find out what your water heater’s specific limit is.
- Never ever send water to the heater that’s higher than the set temperature!
- Tankless water heaters, like all water heaters, have a max flame they can deliver (in my case 100kBTU/h). Hence the output water temperature is not necessarily known or constant as it depends on the incoming temperature.
- Large fluctuations are also possible, that’s another reason why I installed thermostatic mixing valves. When usage in the house goes above 100 kBTU and then rapidly drops, temperature may go from cold to hot and back in seconds! If you’re bathing your kids that’s a high risk activity right there. How this happens? For example the dishwasher pulls water, at the same time someone is washing dishes and then say a third faucet is opened. At some point the tankless heater can’t handle it anymore. In tank-based water heaters temperature cannot drop rapidly since there are over 40 gallons of water in the tank buffering short term blasts of cold water entering it.
- Flue gas condensation. This is extremely important if you want very high efficiency ratings of 95%. Newer gas water heaters use condensation to pull additional energy from the flue gases. However, this requires the incoming water temperature to be below approx. 55°C, 130 °F (that’s why you see these numbers in the diagram above). Again if your water heater has a tank that’s another thing you don’t have to worry about, but with tankless it’s a big issue and it complicates the design of your radiant heat system quite a bit because water has to be cooled off sufficiently before it’s sent back to the heater. In our design above this means the heat exchanger absolutely has to be good quality to move as much heat from one loop to the other; otherwise, the water going back to the heater is still too hot!
- Apart from the minimum flame of 16,000 BTU mentioned above, tankless water heaters also have a minimum GPM flow that needs to be taken into consideration.
- In order to be efficient, the radiant heat system has to keep the flame on for as long as possible. Turning water heaters on and off too often is not only inefficient, it also reduces their lifespan.
- The radiant system should use no more than six heat cycles per hour, on a very cold day. The way my system is set up now, it would turn on the water heater up to 3-4 times per hour for about 10-15 minutes a stretch.
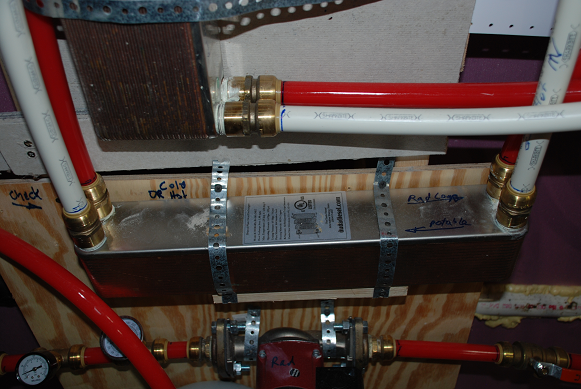
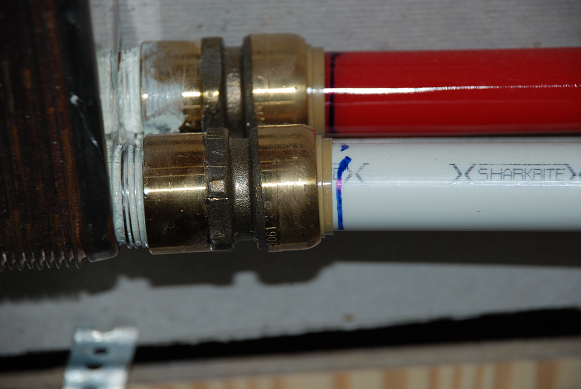
How to Connect the Potable Loop System
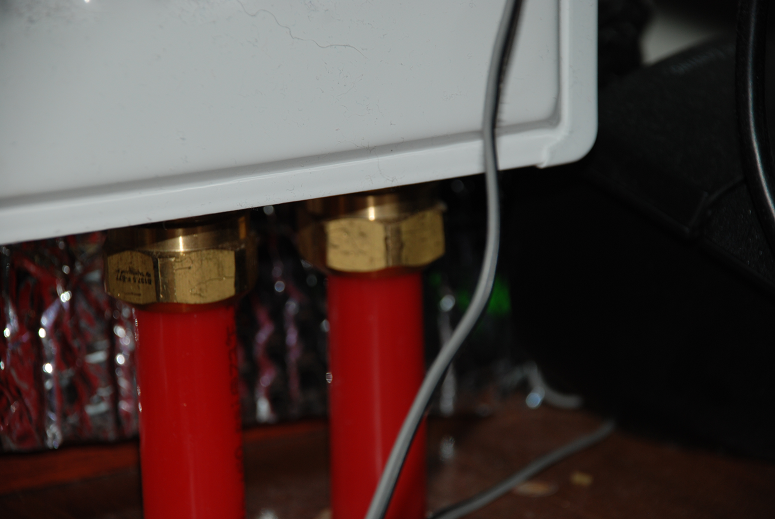
As you can see below I used two kinds of PEX pipes for my prototype (I plan to redo it once more using copper, to achieve that “professional look”, some time before retirement 🙂 ). The white pipe is for potable water while the red pipe has a chrome oxygen barrier. The barrier in the plastic pipe is necessary because, believe it or not, oxygen can get through the pipe and rust your system inside out! But because the barrier contains these protective chemicals it’s not suited for domestic potable water and that’s why you need two kinds of PEX in the house….
Below you see how the connection to the heat exchanger was made using NPT Sharkbite adapters from Home Depot (God I hate that store :)). On the thread you put pipe dope to make a good seal. It’s rated for high temperature and pressure, just like the fittings and the PEX, too, last to near boiling temperature and 150 PSI:
A strainer is very important. You place it before the water enters the heat exchanger(s) on both loops. Again you’ll need adapters to get back to PEX:
Same story with the expansion tanks. Lots of adapters are needed but the beauty is “click and you’re done”…well worth the money in my opinion:
An Overview of the Prototype
Yes you will certainly think I got to LMAO, but hey, it works, it’s reliable, cheap, leak and trouble free. If it satisfies my wife (“make sure it doesn’t blow up”), it’s good enough for me.
Remember, it’s a prototype. Well to be precise it’s a deutotype, since it’s the second attempt. Thank you for your patience:
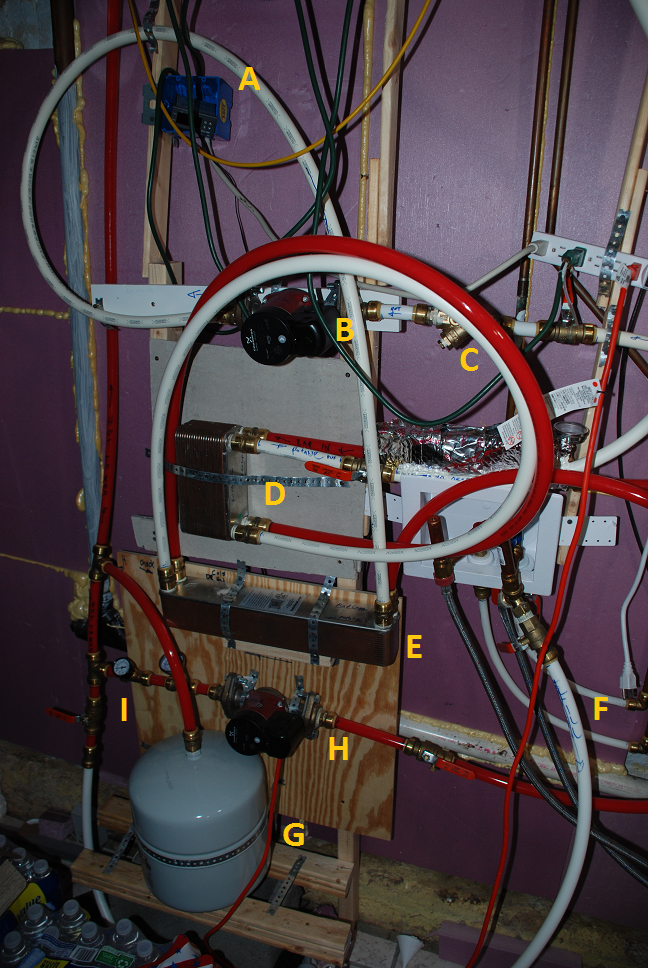
A: is the thermostat STC-1000. An electronic mini device from amazon for about $15. It has relays for cooling and heating and was easy to set up, here’s a close up:
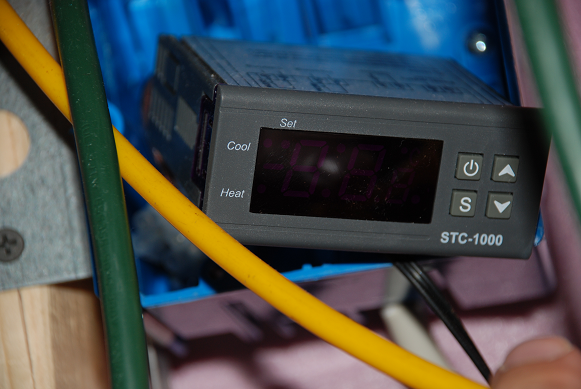
Yeap, it only does Celsius I can hear Canadians cheering…
B and H: Grundfos Alpha Stainless pumps. Close up was shown earlier in the article.
C: strainer. Below the C you’ll notice silver tape. It’s the second strainer and the temperature sensor is wrapped in it on top of the strainer to get an accurate reading of the return water temperature.
D and E: these are stainless plate heat exchangers. I bought D first and wasn’t satisfied. It turns out the length of the heat exchanger is much more important than the depth (number of plates). Buy a long one, like “E” shown above. You can place two or more in series like I did for additional efficiency if need be.
G: Expansion tank
I: pressure and temperature gauges and drain / fill valve
F: fill valve. I added a Y fitting to share hot water with the washing machine. Once you fill the closed radiator loop, you close the valve and the loop is sealed off.
Prototype Discussion
What looks like a “meth lab” is actually a very reliable and efficient heating system prototype. Perhaps some code inspector may disagree but I don’t care. I believe all necessary safety precautions have been met; if you spot something please comment below!
All piping is 3/4 in. to provide sufficient heat to the radiators fast enough. The white PEX is for potable water, the red PEX has an oxygen barrier, I believe using chrome, and is hence not suited for potable water.
The valves you see at F and I are for filling the system using cold water shared with the washing machine. Once filled these valves may be disconnected.
The radiator pump H is always on, uses about 40 watts/h and delivers 2-3 GPM.
Important guideline about installing pumps and actually any kind of circulator:
you must have a straight pipe which is at least 10 pipe diameters long before and after the pump to avoid problems.
Because Sharkbite fittings are expensive I tried to bend PEX as much as I could to avoid elbows.
At “C” you see the incoming water passes through a strainer which is like a filter to block particles from entering the heat exchanger. Plate heat exchangers have very narrow chambers and we wouldn’t want them to clog so a strainer on both input sides is highly recommended, see shopping list below for details.
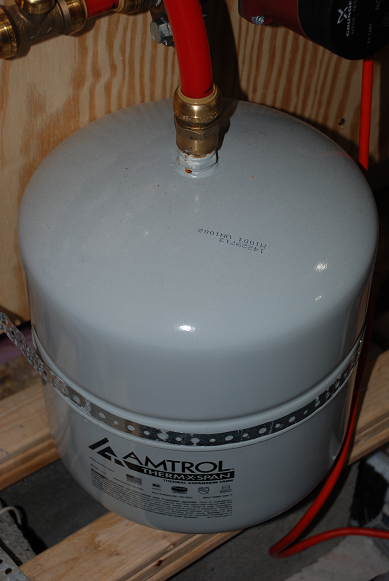
A pressure gauge, temperature gauge (“I”) and an expansion tank “G” are absolutely necessary. The storage tank I have used to be an old gas water heater with a 40 gallon tank (150 l) and has a pressure relief valve, which is also absolutely necessary for a closed system to prevent ruptures.
To give you an idea, the total water volume in the closed radiator loop is about 60 gal (230 liters). The pressure rises from 1 bar (cold) to 3 bar (10-40 PSI) when heated to 60°C (140°F) average.
By the way, this is the storage tank:
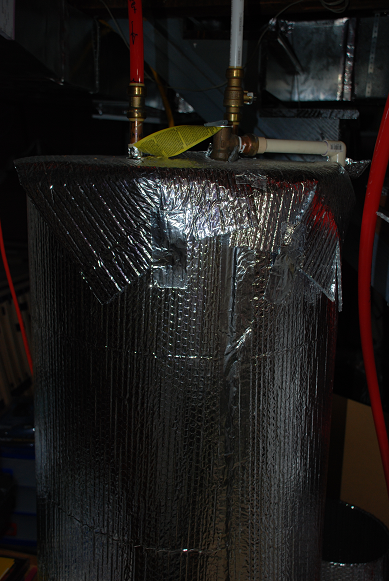
The red pipe at the left above is the return water coming from the radiators. The right pipe I use to vent the system when I fill it or empty it.
The water from the storage tank is taken from the bottom drain valve:
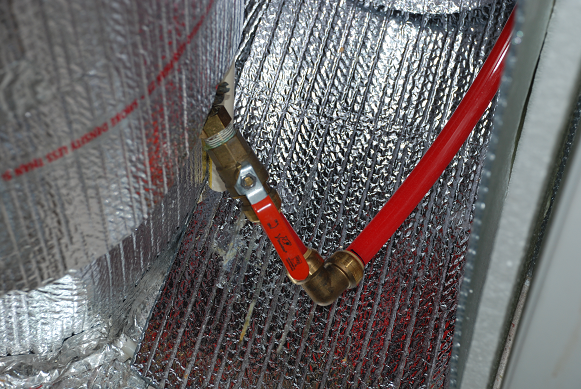
From here the water goes straight back to the heat exchanger “E” to be heated and through the pump “H” back to the radiators.
Underneath the radiator farthest to the pump I placed a bypass loop:
Note there is actually a bypass valve you can buy from Buderus but it only works up to 2 GPM. I decided to use a regular ball valve instead.
This bypass loop was added so that the circulator pump “has something to do” when all radiator sensor thermostats are turned off. This situation occurs when you turn all thermostats down or on a warm spring day when the sun beats on the house and no additional heat is needed.
Update 2015: I replaced the above valve with a “sophisticated” differential bypass valve, see http://www.caleffi.com/usa/en-us/catalogue/differential-pressure-pass-valve-519502a The great thing about it is that no water is passed through until most of the radiator thermostats close; hence, the pressure remains always constant in the radiator loop so that the biggest heat portion goes directly to the radiators. When most thermostats are satisfied and close up, the water is pushed into the storage tank instead.
Buderus Radiator Installation
All Buderus radiators were installed in parallel. When you look at the Buderus Installation Guide, there are many ways to do it but some require bypass valves and other “tricks”. For my regular sized house I wanted to keep things simple and chose the parallel layout.
Adding additional radiators is simple: cut supply and return lines and add T fittings:
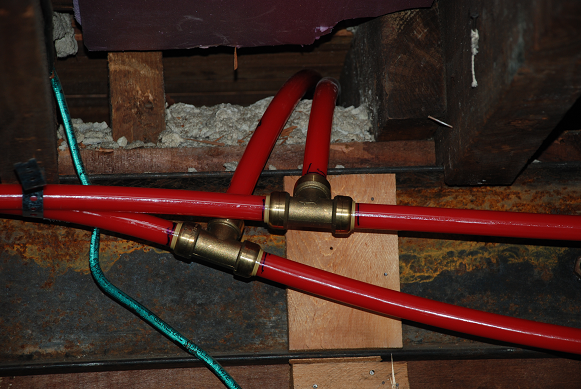
With PEX even a 5 year old can do it (OK you got to help him push the pipe perhaps ;-))
Then, you need PEX compression fittings for 3/4 in. PEX that match the radiator (also sold by Buderus):
You need a 100% straight piece of PEX to get right up here into the fitting. If it’s not completely straight you will waste hours of time!
Make sure you tighten these well and check again after hot water is flowing through the pipes.
Don’t forget the magic sensor head that allows us to heat each room at a different temperature:
Should we use floor brackets or wall brackets?
I chose floor brackets for several reasons. First, wall brackets are tricky to install but they are free. Floor brackets cost $70/radiator. The radiator being so close to the wall is inefficient unless your walls are very well insulated. By using floor brackets I left about 4 inches space and placed a reflective R4 insulation foil on the wall behind the radiator. This turned out to be a very good solution as it reflects the heat back into the room and the foil is very cheap. I got this idea by observing exterior walls in Europe, which are all stucco. In the winter after it rains the area under the window dries much faster than the rest of the wall; I take that as an indication that more heat loss occurs there for the simple reason that radiators are always placed under windows.
Under a Window or Not?
Almost always I would recommend installing radiators under a window; however, it better be a 100% sealed and efficient window!
Because the window is usually the coldest spot in the room, it’s best to place the radiator there. Warm air rises to the ceiling, makes its way to the opposite wall, cools off, and drops to the floor where it returns back to the radiator. If the radiator is installed elsewhere it may result in uneven heat distribution and cold spots.
Unlike baseboard heat that uses very high temperatures, radiator panels work with lower temps (55°C-70°C, 130°F-165°F) and you feel the heat radiating on your skin; hence, the room’s objects are mostly heated by heat radiation (like infrared or a fireplace) and not so much by air movement. For that reason installing the radiator at an interior wall may be an OK solution, for example, if the windows in the house aren’t as efficient as they should be.
Radiator Sizing
What size of a radiator do I need? That’s a good question. I go by the rule “Bigger Better Burger King!”
Yeap, that’s because a larger radiator will work with a lower water temperature. Lower temperature means less inefficiency.
OK, cosmetics is an issue, too. The radiator should augment the style of the room and not look bulky. But I installed the largest Buderus panel to a regular old house bedroom about (12 ft x 12 ft) and it glows. The room is more comfortable than ever. The space under a window is usually unoccupied so that’s pretty much ideal.
Let’s not forget, a large radiator doesn’t mean you’ll sweat! It has a thermostatic sensor and turns off automatically. The beauty is that heat spreads nicely across the room and the temperature is absolute constant, 24 hours a day no matter how the weather changes outside. It’s nothing short of amazing.
A small radiator sometimes is the only choice. You’ll notice the small radiator costs almost as much as a big one (hence another reason for me to buy Burger King style). In narrow areas where only small radiators fit you may need a higher supply temperature in your system. And that’s where things may get complicated!
You could run water through one radiator and then into another in series rather than in parallel (what I did), using a bypass valve under each panel. But then the radiator loop needs to be heated higher, perhaps to 80°C or even 90°C. PEX can handle up to 95°C and so does the Alpha pump. The heat exchanger is virtually indestructible, so all options are open but require some careful planning.
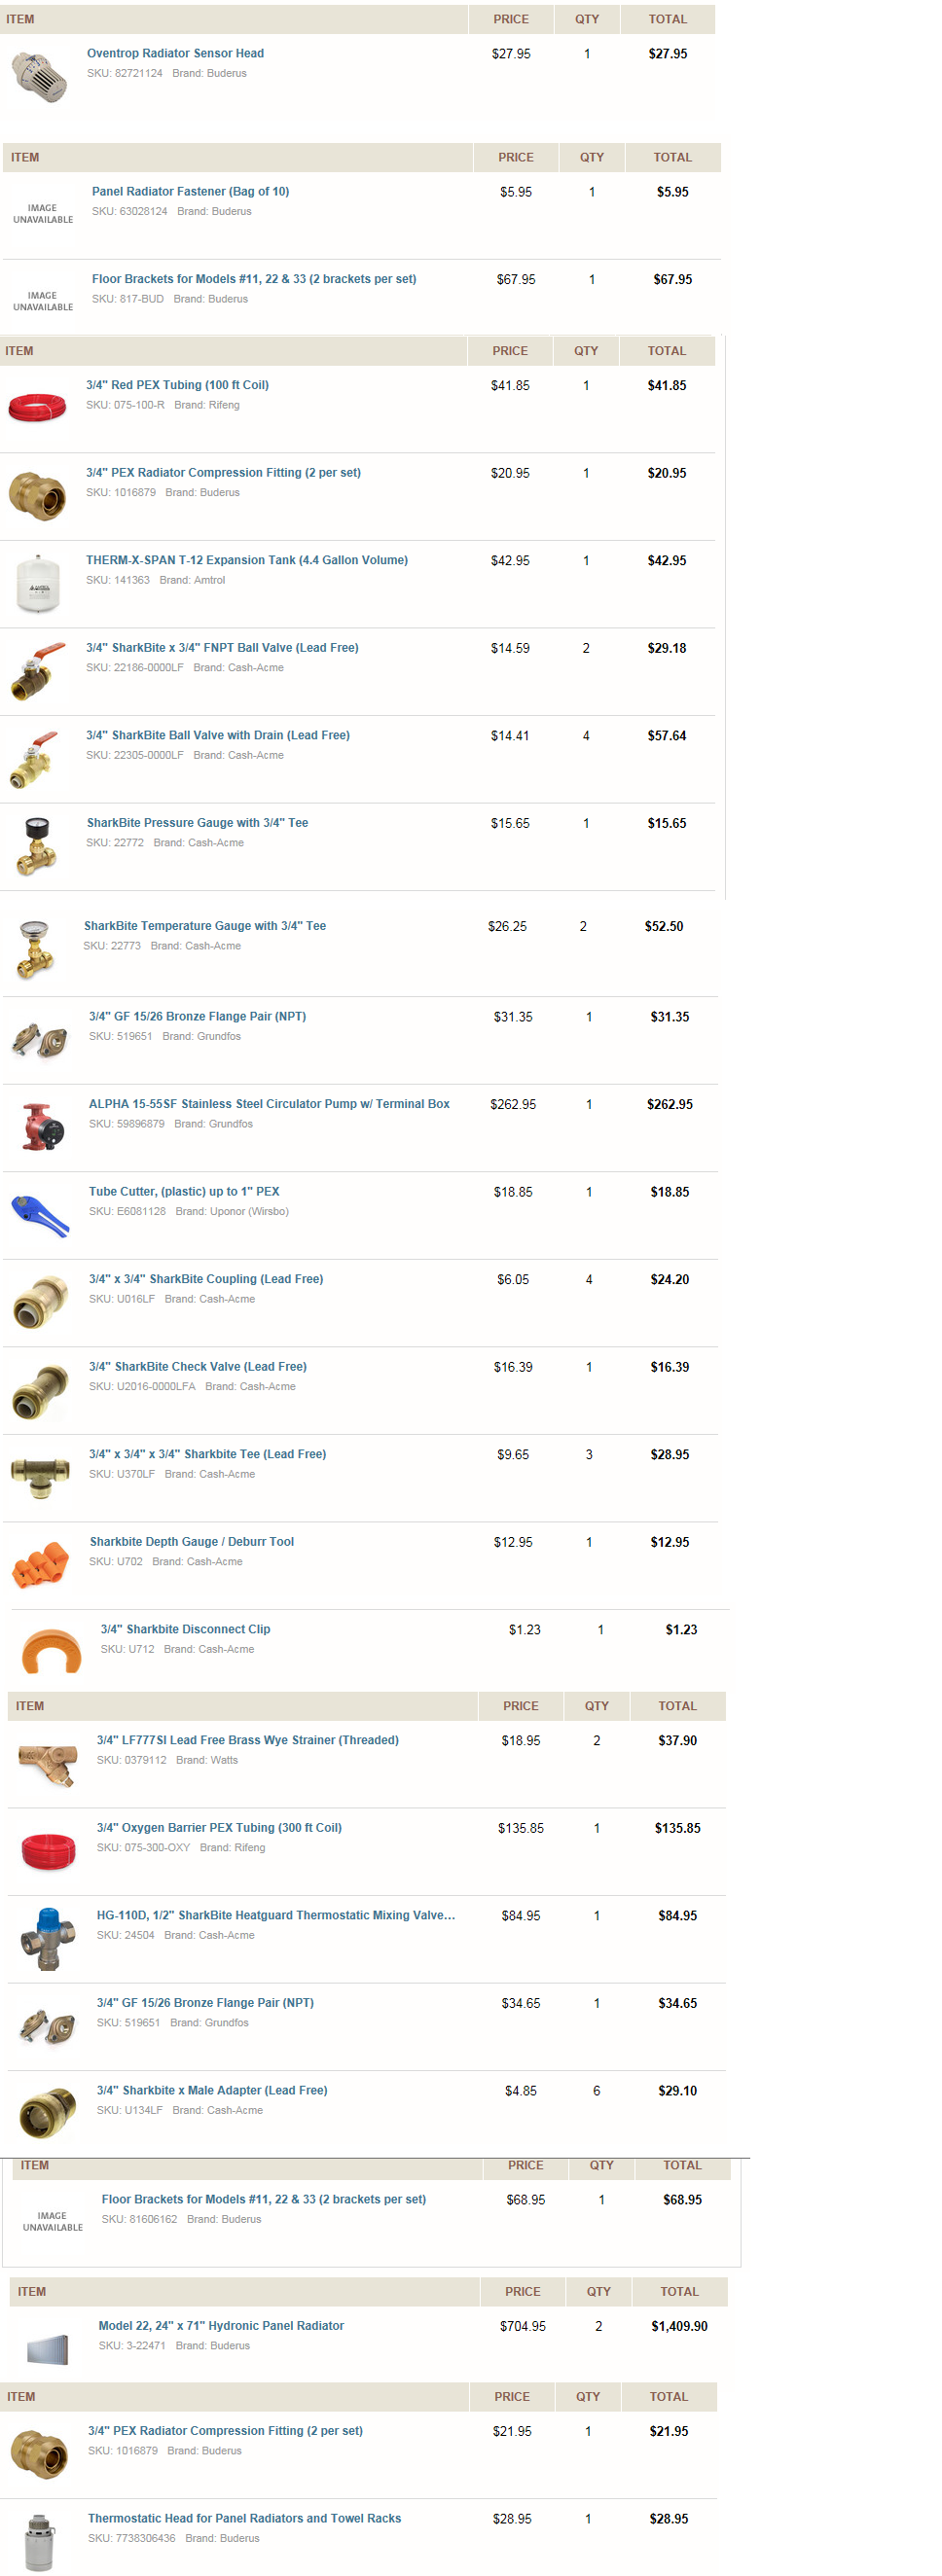
Shopping List
Note the following shopping list is partial because some parts where obtained from, where else, Home Depot and some parts I already had in the basement.
I would like to add two things: check out the user guides, submittal sheets, installation guides, etc. at supplyhouse.com even if you don’t buy from them and read them carefully. This is where I got most of the information from to build the heating system.
You’ll see the big chunk of money went to Sharkbite fittings and naturally the Buderus radiators themselves, which are priced insanely high here in the U.S., but you can buy them one by one and shipping is included. For example, the large Buderus here costs $750 delivered to your door free. In Germany where these beasts are built, it costs 200 Euros with national delivery. Granted, it’s heavy, it’s over the ocean, it’s luxury, and the U.S. is a big country so flat rate shipping is going to cost and some people in between need to make a living, too.
A good thing I can say about supplyhouse.com (I don’t receive money for promoting them here, but hey if they dropped a beer I would drink it 😉 they deliver the next day and if they screw up you can print on your computer a free UPS return label, go to staples or a UPS store and drop it off for free. The land of the U.S.A is the kingdom of service after all!
There are now additional sources where you can obtain Buderus as a DIY guy, ie. retail, online.
Closing Thoughts
First and foremost, the motto is “YES YOU CAN“. If I managed to set this up with zero plumbing and hydronic heat experience, anyone can do it!
Now regarding the system design, I don’t believe the storage tank is absolutely necessary. I remember when living in Ireland in modern row houses, the tankless heater was “camouflaged” in a kitchen cabinet and would vent through a hidden pipe in the wall to the outside, without a storage tank. For some strange reason, however, they always used a separate electric water heater for the domestic hot water supply. I’m not sure why they didn’t share the system to do both; perhaps a building code requirement?
I guess the complexity of the system greatly depends on the characteristics of the water heater you have. The Eternal water heater I have is great but a PIA as big as our galaxy to get it to work as a space heater. Remember it was not intended to be used that way and likely warranty is lost with yours, too, if you use your water heater for space heating. From the perspective of building a radiant heating system, the best system to buy is a water heater with a tank. Tankless is painfull.
Wouldn’t it be better to invest in a boiler? Many experts argue a water heater with its stainless tank inside is actually more robust than a boiler because it can handle sudden temperature drops, which boilers supposedly can’t. In addition, stainless tanks are awesome to work with because they aren’t subject to corrosion as much as iron-based boiler components. If you wanted to buy a boiler for radiant heat you could use it as a hot water heater, too, by adding an indirect water heater but those sometimes cost as much as a new tankless!
Where I live, having a domestic water heater heat your house is only necessary in the winter; hence, it “abuses” the water heater only for about five months. After that you turn off the system and reduce the water heater temperature to “normal” levels. The eternal cost me about $1,500 to install, way cheaper than a $10,000 ticket for a boiler. Plus a boiler setup is way more complex and I would lose the last hair on my head trying to make it work…
You see, when you take a pen and write down all the costs of having something installed compared to doing it yourself, you could probably redo your project five times and still save money. Especially when you consider using a water heater as your heat source, the savings are even higher.
Yeap you could blow up the house, too, but that depends very much on your work ethic 😉 rather than your skills. By studying installation guides and other literature carefully anyone can learn this by doing. Youtube is another great resource. And, of course, the best resource is the internet where you can find forums and manufacturer websites with tons of info and where you have the opportunity to contact experts for their advice. The only thing I wasted was about $200 worth of potable PEX pipe because I started off building an open-loop underfloor heating system and then converted it into a closed loop system.
Plumbers are always a wonderful resource and extremely helpful (in my case it’s Brian, remember the best in Baltimore!). Other people I contacted, including the Buderus tech support, were also very helpful. And I would like to add they don’t have to be. When I installed my packaged air conditioner “Goodman” I called the company for a simple question regarding a replacement part and the answer was “are you a homeowner? yes! Then call your installer, have a great day.” So Buderus is way ahead in my opinion.
I think when asking for help the important thing to do is to respect the expert’s (or manufacturer’s) time and do plenty of research ahead of time so you can ask the right questions, not something that a Google search can answer in a second. An interesting question is also rewarding for the expert who is always hungry for new challenges, too.
Performance-wise, the storage tank introduces a peculiarity that I wish to reduce or eliminate when finalizing this system. When the heat is ON, radiators are fed with “fresh heat” at about 70°C (165°F). When the return from the storage tank reaches 56°C (132°F) I set it to turn off the potable water circulator pump. As soon as the pump switches off, the tankless turns off its flame, too. Now water is taken from the storage tank to feed the radiators; hence, the radiator supply drops from 70°C to 56°C. As hot water from the radiators is still on the way to the storage tank, the storage tank temperature actually continues to rise, even though the primary loop is off for several minutes. I have seen the water rise to about 59°C on average.
So the water rises to 70°C with the water heater ON, dips to 56°C when the heater is switched off by the thermostat and then rises again to 59°C peak. It slowly comes down to 53°C and this is when the thermostat kicks in again, heating the water to 70°C. I would like to reduce the magnitude of this fluctuation in the future but I’m not yet sure how. Ideas are always welcome!
License
You may reuse materials from this post as you wish. Please link back to this post when doing so. Thank you!
Hopefully this guide contains enough info to get you started!
Other Stuff I Work On
Most of my time isn’t devoted to Buderus installation but rather to improving Hyper-V backup technologies. I love to renovate and who knows, perhaps one day it may become lucrative to make a full time job out of it!
10 Comments
Would eliminating the storage tank help to eliminate the temperature fluctuation going to the radiators?
I placed the storage tank at the end of the loop before the water goes back to the heat exchanger. The idea was to buffer temperature fluctuations before sending the water back to be heated. For example if one of the radiators’ thermostats is opened suddenly all the way up, the cold water will quickly drop the temperature of the return line. Before that water gets to be heated again it falls into the storage tank (about 40 or 50 gallons) where it is mixed first. This balances any sudden drops or increases in water temperature.
You could probably eliminate this tank without issues. In Ireland our houses had a very small tankless water heater with natural gas hidden inside one of the kitchen’s wall cabinets. There was no storage tank, so it worked the same way but their radiators usually do not have thermostat valves, just regular flow valves.
Hope this helps!
Also where did you get your storage tank, which one did you use? I can’t seem to find one.
Hi Jacob
the storage tank is an old 40 gallon or so natural gas water heater. It’s no longer connected to gas or chimney and I use it as a buffer only to hold the water in the loop before it returns back to the heat exchanger.
Hi – great blog. Does your system use much gas keeping the house warm? You mention the heater cycling on for 10-15 mins, 3-4 times per hour.. Does that mean the heater is running almost all the time?
Thanks again
Hi Shea
my gas bill is about $100-$150 in the deepest winter here in the D.C. region, which isn’t bad at all. My natural gas A/C would burn about 30%+ more and especially also much more electricity for the blower fan. The circ pump in my system only uses 45W and handles the entire house with three floors easily. The water heater would be on about 20-30 mins per hour in extremely cold weather, far below freezing, say -15C and below. Otherwise cycles are few and short. You can reduce the number of cycles by switching to a higher temperature. I use 55C when the weather is rather warm, like in fall and spring. Then switch to 65C or 70C in really cold weather. A larger storage tank will also help ‘stretching’ the cycle so it lasts longer, which is good for efficiency and then it stays off longer, too. And the last variable to keep cycling to a minimum is the delta temp, the temp at which you set your heating cycle to turn on. I use a delta of 3C, you could increase it to maybe 5C without noticing the house temp going up and down, it’s up to your preference. A small delta will cause more cycles to occur.
Hope this helps!
Great blog! I am curious about the radiator loop, I would have expected a feed water line in addition to an expansion tank. As air leaves the system, over time don’t you need to replace that with water to maintain pressure?
Hi Geordie thank you very much! The system has no leaks and hence doesn’t require a permanently connected supply line. You need to have a pressure gauge so that you can see if there is leak somewhere. It’s try that you may have to add some water after a few months and after venting the radiators, but that’s minimal. I would not connect the water supply to the system as it would mask a potential leak.
Hope this helps!
Savas
very good material, i just have one thing that I dont understand with your wording: ” You could run water through one radiator and then into another in series rather than in parallel (what I did), using a bypass valve under each panel. But then the radiator loop needs to be heated higher, perhaps to 80°C or even 90°C. PEX can handle up to 95°C and so does the Alpha pump. The heat exchanger is virtually indestructible, so…” – could you please clarify if the phrase “(what I did)” refers to you did a parallel installation using by pass valves, or did you do a series installation, using by pass valves, or a series installation not using by pass valves. My sense is one uses by pass valves in a parallel installation and that is what you mean you did. But unfortuately i’m not sure this is your meaning. Thanks for the great help in this great presentation. Sam
Hi Sam
my apologies for the confusion. I wrote the whole thing pretty much as a note to myself for future reference without re-reading it;-)
The setup is now in operation for a handful of years and there are a couple things I would like to change in the future.
The way it works now is all radiators are in parallel. One circ pump is always on for the radiator loop. Hence, if all radiator thermostats are satisfied, the water flow would stop completely. A bypass valve was installed so that if pressure builds up, the pump can still run the water through to the storage tank. The return water temp is measured and when it reaches a certain point, the water heater (and the secondary pump to it) is switched off.
What I would like to change in the future is to locate the bypass valve as far away from the pump as possible so that the bypass only occurs when pressure builds up beyond the radiators. Right now it’s too close to the pump so there is a little bypassing going on even when some radiators are still calling for heat. Increasing the distance away from the pump should definitely help.
Second, there are some piping loops where apparently some air bubbles form. I am not sure exactly where this occurs. The pump speed (radiator loop) then reduces to just 1gpm and that’s a problem because the water heater will run on cold days continuously because of it. I need to install 1 or 2 more air separators to prevent this from happening.
What’s also interesting after years of operation, the heat exchangers stay clean on the domestic water side. Only in the radiator loop do they get dirty and should be cleaned with vinegar once a year. I had expected the domestic potable water would be bringing in dirt but it actually doesn’t at all.
Hope this helps & good luck building your own system!
Savas