
Ultimate Guide | How to Copy Hyper-V VMs to Another Host
| IT | No Comments
 Do you want to copy a Hyper-V virtual machine to another host and don’t know how? You came to the right place! We’ll discuss all the main options in this article. But in order to find out the best option for you, you need to first answer one question.
Why Do You Want to Copy a Hyper-VM to Another Host?
That’s a good question indeed, because the solution to this question depends very much on the purpose of the copy. If you just want to move all VMs from one host to another, let’s say because you are going to do some work on the host, then moving the VMs is permanent and a one-time thing. But if you want to set up a scenario where your VMs are copied automatically from host A to host B, so that you can use the VMs on host B if host A fails completely, then we’re talking about something totally different. We’ll discuss both solutions in detail in the following sections. First let’s have a look at the manual option.
How to Copy a Hyper-V VM to Another Host by Hand, One Time
In order to copy Hyper-V VM by hand, the easiest option is to use the Export function in the Hyper-V Manager, as shown below:
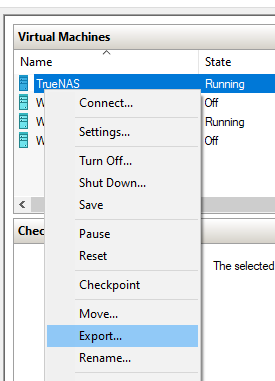
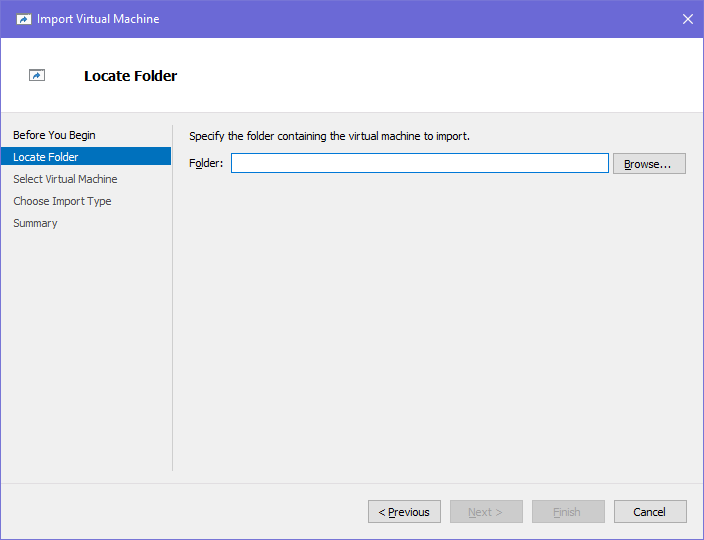
The next screen will ask you were to place the virtual machine files. When finished, move to host B, the other host, and open Hyper-V Manager. Select the option ‘Import Virtual Machine’ and select the path. That’s all there is to it!
How to Automatically Copy a Hyper-V VM to Another Host Based on a Schedule
Now let’s get to the meat! Doing the above manually is cool when you need it done just once. But what about if you need to copy the VM several times a day? The so-called ‘poor man’s’ fail-over cluster solution is to simply have two Hyper-V hosts and copy the VMs from host A to host B. Ideally you will want this done automatically so that the VMs are always ready to go when you need them, in case host A fails. This is actually something very useful and I know many companies that do this using BackupChain.
The folks at BackupChain developed a very simple and effective solution to this problem. You only need BackupChain installed on host A. There, you set up a Hyper-V Backup task with the ‘no processing’ option enabled. The target of the task is a network share on host B. Then you select the VMs on host A that you want copied and BackupChain will do the rest. Finally you set a schedule and the copies will be done on auto-pilot! As an added bonus, BackupChain can notify you if any errors occurred, so that you know if the process failed for any reason.
On host B, the only thing left to do, just once, is to set up the VMs again, once the first copy has finished. Once the first copy of the VMs is on host B, you will find the VHDs on host B in their respective folders. All that needs to be done is to set up the VM on host B and point to the VHDX file that was copied over, instead of creating a new one.
The steps are shown in detail below. After installing BackupChain, click “New Task” and select ‘Hyper-V Backup’ and click Next:
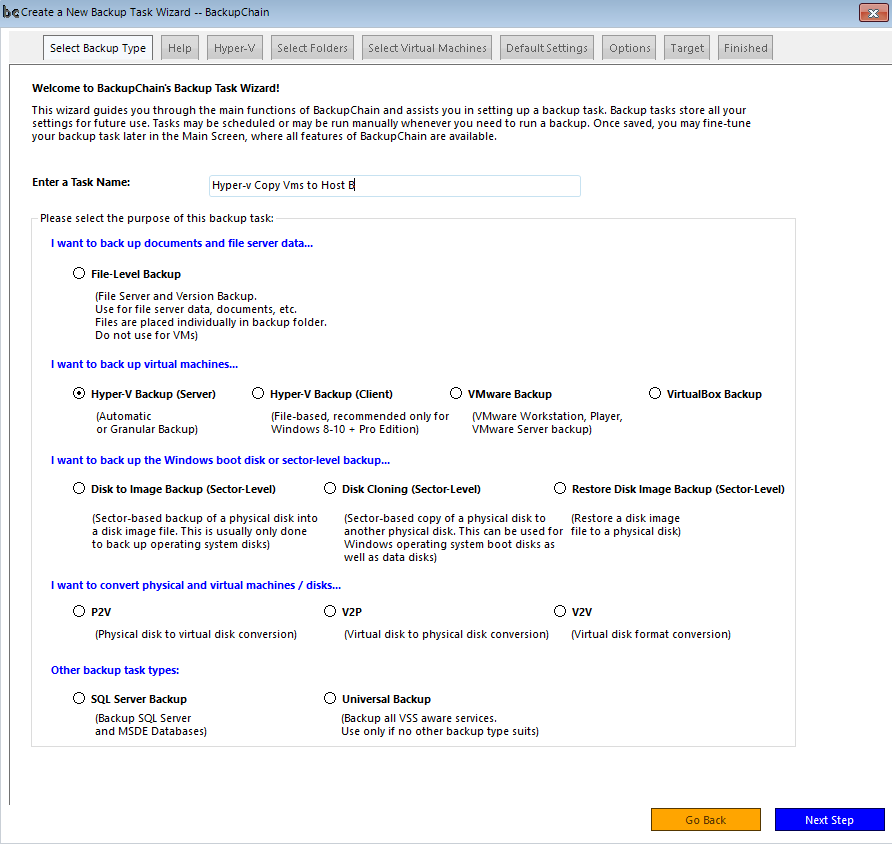
Click next on the following screen, accepting defaults:
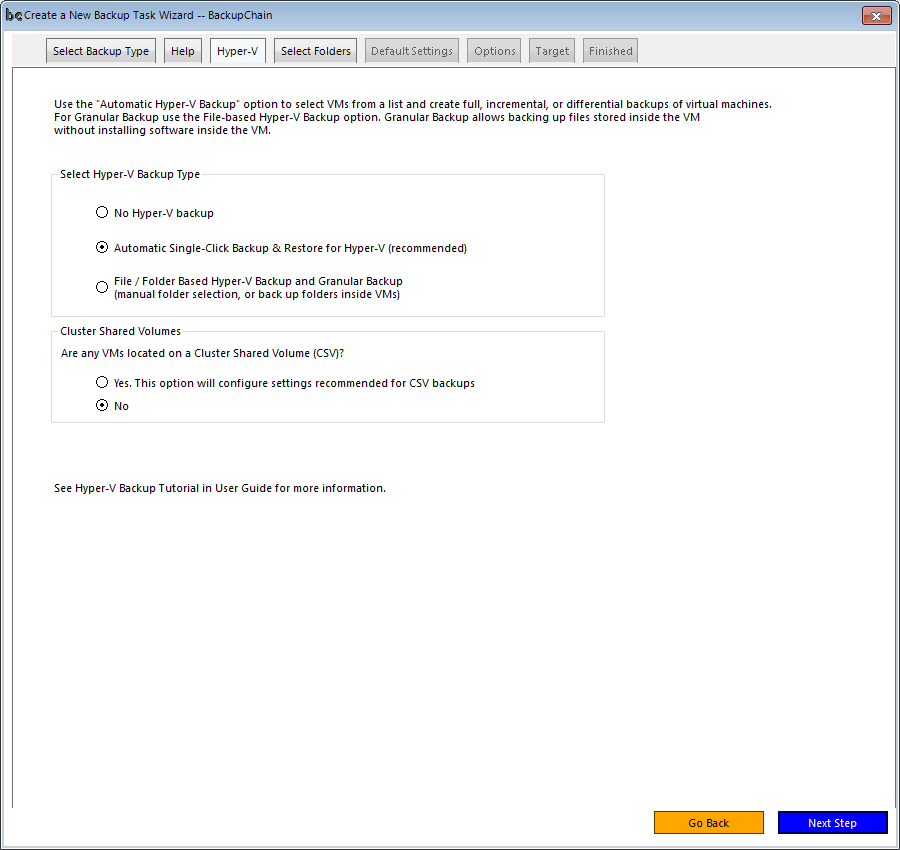
Now select one or more VMs that you want copied to host B:
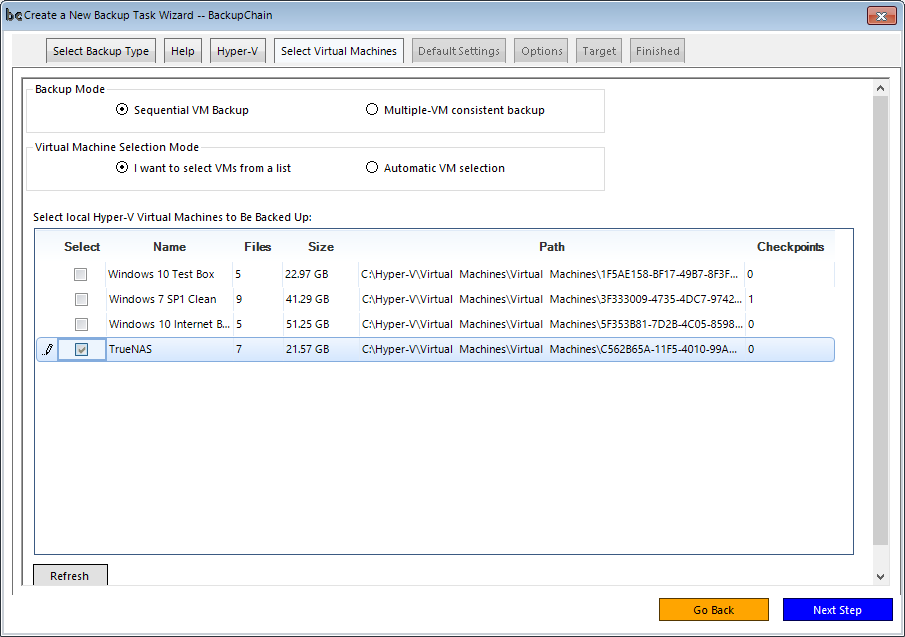
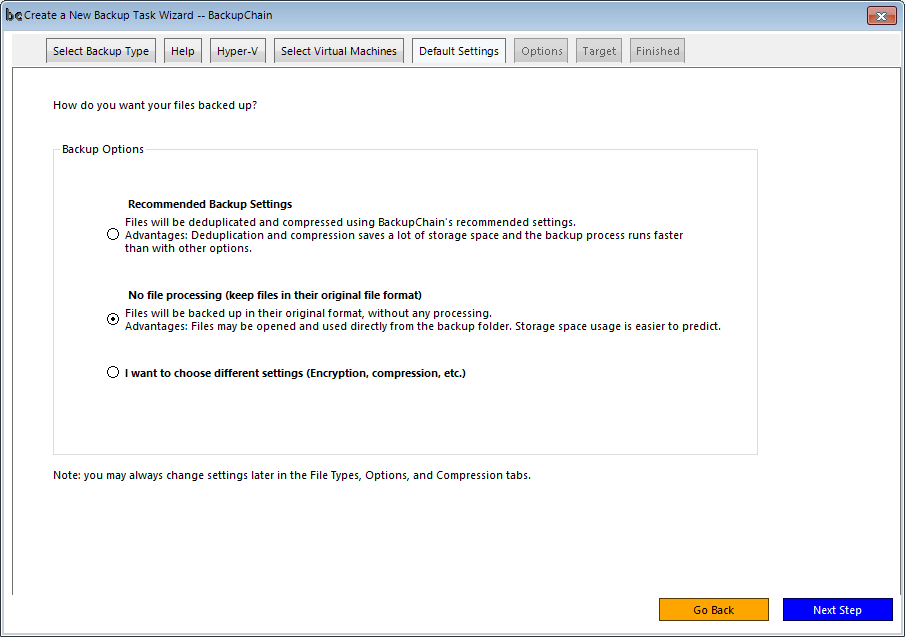
Click “Next Step” and in the following screen, select ‘No processing’:
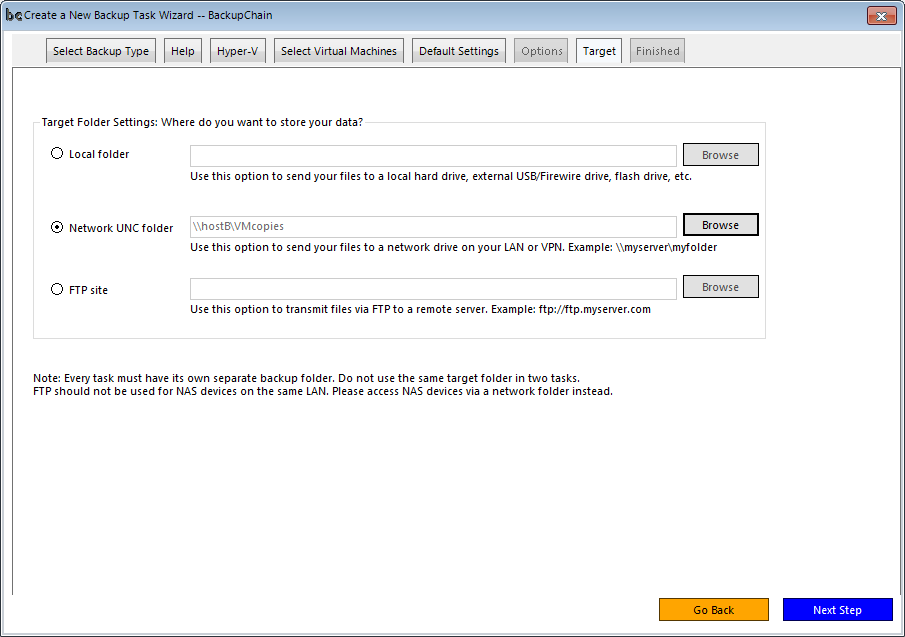
In the next screen you need to select ‘network UNC folder’ and specify the UNC path to host B. Ideally you will have already prepared a network share on host B, where you want the VM copies stored. If you haven’t done it already, now is a good time to set it up. Then click ‘Browse’ as shown below and enter the UNC path details:
Then click ‘Next Step’ and finally ‘Save task and edit’. Once you have saved the task, switch to the tab “File Versioning / Cleanup” and set all cells to 1 (Min. Number of File Versions):
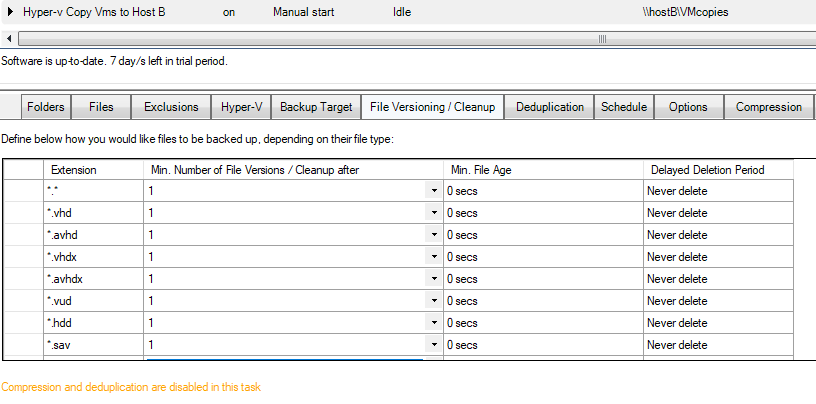
By setting those cells to 1, we instruct BackupChain to only keep one copy at host B. You could, if you want, keep more than one copy on host B. In that case the oldest copy (or file version) will be deleted automatically, based on the number you enter above.
That’s all there is to it! Now you can set a schedule in the tab Schedule and run the task.
How to Set Up the Copied VMs on Host B (One Time Configuration)
After the first VM copy is complete, you need to create the VM just one time on host B, so that it is ready to go. Open Hyper-V Manager, create a new VM, use similar settings for RAM and CPU core count, and when you get to the section ‘Connect Virtual Hard Disk’, select the VHDX that BackupChain placed on host B, as shown below:

In our example, BackupChain places the VM copies into the folder D:\VMcopies. You will need to select the folder that you created instead. You will see that BackupChain recreates the original folder structure in the target folder. In our case, you can see that the original VHDX came from X:\production VMs\TrueNAS\truenas.vhdx. Then continue with the VM setup and click ‘Finish’.
The copied VM on host B is now ready to go. Please keep it turned off so that BackupChain can safely replace all VM files when it copies the new version over.
Copying Hyper-V VMs is Indeed Easy
As you can see, there are two major and simple ways to copy Hyper-V virtual machines from one host to another. You could either use the Export function built into Hyper-V Manager to obtain a copy of the VM and that works fine when you need to do this process just once per VM.
In the case where you want to set up an automated VM copy, so that the VMs on host A are always available on host B, you could simply use BackupChain and follow the above steps to set up an automated copy process. Automating the copying process allows you to set up a low-cost, fail-over system that will provide a system you can use immediately if the main Hyper-V host fails.
Simply download BackupChain and give it a try. Setting up your first VM copy task as outlined above is really easy and there are many more features you can use in the future, such as email alerts, and compression, deduplication, and other backup features that you could use in addition to your VM copy tasks.
What to Expect when Copying Hyper-V VMs with BackupChain
When you’re managing Hyper-V VMs and you need to ensure they’re copied to another host automatically, you quickly realize that doing it manually can get old fast, especially when you’re juggling several machines at once. I’ve been there, trying to keep track of backups or trying to move VMs around on a regular basis. The thing about having VMs on different hosts is that you never want to rely on manual processes, because let’s face it, they’re error-prone, and you don’t always have the time or attention to make sure it gets done right every time. That’s where BackupChain comes in with the scheduling feature, and it makes all the difference in how smoothly things run.
The first thing that hits you when you set it up is how easy it is to get everything up and running. I know sometimes you expect complex setups with software like this, but with BackupChain, setting up a scheduled task to copy VMs to another host is straightforward. You just choose the VM, select the target host, and pick your schedule. Honestly, it’s almost like a no-brainer. Once it’s configured, you don’t have to think about it again unless you want to change something. It feels like the backup or copy task is happening on autopilot.
I’ve had to move VMs between hosts several times, either to offload some resources or for disaster recovery purposes. The ability to schedule this process gives me confidence that everything is always up to date. The cool part is that you’re not interrupting the VMs while they’re running. They keep operating normally while BackupChain works its magic in the background. You don’t need to stop the VMs or schedule downtime, and that’s a huge win in any environment where uptime is critical. You can just set it and forget it, knowing that your VMs are being copied to another host on a regular basis without disturbing the users or applications running on them.
Another huge benefit is that the copy doesn’t take as much time as you might think. Hyper-V VMs can get pretty large, especially when you’re running multiple applications or dealing with a lot of data. What’s great about BackupChain is that it doesn’t just copy the whole VM every time. It uses an incremental approach, so only the changes get transferred, which makes the process much faster and saves on bandwidth. This is especially helpful when you have limited network resources, and you can’t afford to slow down other operations or affect user experience. When you’re working in an environment that’s constantly changing, this incremental method means you’re only copying over what’s been modified since the last scheduled task, which makes the whole process way more efficient.
The real beauty of it all is how hands-off it is. Once you’ve scheduled the copy jobs, they run automatically. No need to log in, initiate anything, or keep track of the time. If you’ve got other priorities or projects that need your attention, you can trust that BackupChain will handle it in the background. This becomes even more useful when you’re working with multiple VMs across different hosts. Imagine trying to manually copy over 5 or 10 VMs each week—it would quickly become a headache, not to mention that it takes up valuable time. With BackupChain’s scheduling, you can set it once and let it keep the copies in sync without interrupting your daily workflow.
When you need to have copies of your VMs on different hosts, you’re essentially building in redundancy. It’s the kind of fail-safe that makes sure if something goes wrong with one host—whether it’s a hardware failure, an unexpected shutdown, or a network issue—you have a recent, usable copy of your VM already sitting on another host. I can’t tell you how many times this has come in handy when things go sideways. Instead of scrambling to restore from an old backup or trying to recreate a VM from scratch, you can just power it up from the other host, and you’re back in business. That kind of security and peace of mind is invaluable when you’re managing business-critical systems or services.
There’s also flexibility in the types of storage you can use. Whether you’re copying VMs to a local storage device, another server on the network, or even to a remote location, BackupChain lets you tailor the process to your specific needs. This flexibility can be a lifesaver if you’re trying to move VMs between different storage types or you’re working in a hybrid cloud environment. The software adapts to whatever your infrastructure looks like, so you don’t have to worry about compatibility issues or trying to figure out how to make it all fit together.
As you get into it more, you’ll notice how well it integrates with your existing workflow. Once you’ve set up your schedule, the copy jobs become just another part of your regular management tasks. You don’t have to stop and manually back up or copy over VMs each time. In fact, the whole process just feels like it’s been woven seamlessly into your routine. I know for me, the ability to automate that whole process has freed up time to focus on other tasks. I no longer have to constantly remind myself to copy VMs over to another host—it just happens in the background. The scheduling is so reliable that I never have to question whether the task will run when it’s supposed to, and the confidence that brings is huge.
And the best part is that this doesn’t only apply to production VMs. Even if you’re testing something new or setting up a staging environment, you can copy test VMs to another host to keep them isolated. With the automatic scheduling, you can also create an environment where everything stays up to date without you needing to manually copy test VMs over each time you make a change. It gives you the flexibility to work on multiple projects at once without worrying about whether your VMs are properly backed up or replicated to another location.
The fact that BackupChain handles the whole thing in the background means you get all the benefits of having your VMs copied without any of the hassle. There’s no extra overhead for you as the administrator. Once the initial setup is complete, it’s a pretty smooth ride. You don’t have to babysit the system, and you can be confident that your VMs will be kept in sync across hosts as per the schedule you set. It’s a stress-free way to handle backups, failover scenarios, and general VM management.
All in all, if you’re looking for a way to automatically copy Hyper-V VMs to another host without the constant manual work, BackupChain makes it feel effortless. The ease of use, combined with its efficiency and flexibility, makes it a great tool to keep your virtual machines safe, accessible, and ready for whatever might happen next.